
How do I edit my pictures? - Tips for having PRO fashion blog pictures
9:00 AM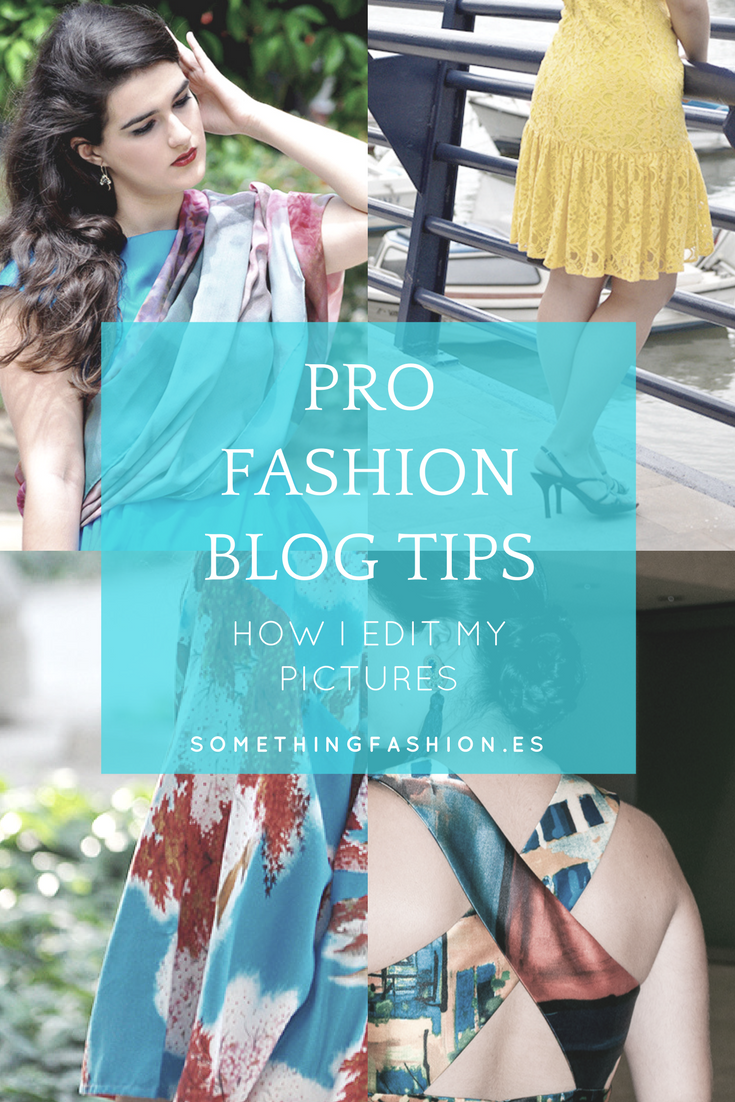
It's not secret that every influencer or fashion blogger in this world has to edit their pictures somehow to achieve great quality content and impact visuals both in their sites and social media platforms. I'm tired of seeing SO MANY fashion blogs that absolutely lack in quality pictures, where their bloggers post the exact same picture in the same spot repeated almost 9-15 times per post, and where lighting and angles are far from being great. That doesn't appeal nor even invite me to keep reading a fashion blog. And I say this because I'm a geeky, insupportable perfectionist girl versed in visuals and architecture, who loves caring for detail and whose fashion blog pictures aren't taken by professionals in any way, but instead, shot by friends and family who are always kind enough to do me a huge favour into this.
In today's post, I want to show you that if you have a fashion blog (or blog of any sort) or at the contrary, you are planning on becoming an influencer or just planning on boosting your social media accounts, you don't need to splurge all your savings in a professional equipment or photographer. You just have to be a bit more thoughtful when it comes to the content you share, and pay a bit of attention to these little tricks I'm going to share with you today to achieve a PRO fashion blog. I've even shoot the pictures for the blog by myself sometimes, with a tripod and a remote.
So, let's get started! How do I edit my pictures and what is my advice for achieving a great quality fashion blog?
#1 Shooting at dark as less as possible
Dark is your worst enemy E-V-E-R. Specially when shooting fashion, as you'll have some serious issues when moving around and getting some dynamism in your pictures, as they'll get all blurry and confusing. Not nice. In fact, if you ever get close to nice quality pictures, you'll have to spend endless hours editing them, as I did in one of the last collaborations I shot for Lightinthebox.
Instead, try shooting while in the Golden Hour (just a bit before the sun sets) or early in the morning, so you won't be under direct sun but still get awesome fashion blogger pictures with nice and soft hues and no harsh angles at all.
#2 Always correcting green, orange and red hues
Greens are the worst tones whenever I try to print anything related to urban planning or architecture floor plans. It's super difficult to balance and smooth them out, and they always seem to look wrong. The same applies to fashion pictures: greens, oranges and reds always seem to stand out A LOT. It's not bad to give them the main character spot if they're under control anyway, but let's say that desaturating them a bit with your photography software will balance the whole picture and keep everything coherent.
Greens are the worst tones whenever I try to print anything related to urban planning or architecture floor plans. It's super difficult to balance and smooth them out, and they always seem to look wrong. The same applies to fashion pictures: greens, oranges and reds always seem to stand out A LOT. It's not bad to give them the main character spot if they're under control anyway, but let's say that desaturating them a bit with your photography software will balance the whole picture and keep everything coherent.
#3 Low saturation
This is actually quite personal but, I prefer low saturated pictures where the colors doesn't draw much attention. Not to the point of getting rid of the pictures' hues at all, but I prefer going for subtler, softer colors than striking ones when it comes to the pictures in this blog. I always try to find that balance between luminosity, great exposition and great colors but still trying to achieve that soft look of colors that doesn't stand out much. Kind of tricky!
This is actually quite personal but, I prefer low saturated pictures where the colors doesn't draw much attention. Not to the point of getting rid of the pictures' hues at all, but I prefer going for subtler, softer colors than striking ones when it comes to the pictures in this blog. I always try to find that balance between luminosity, great exposition and great colors but still trying to achieve that soft look of colors that doesn't stand out much. Kind of tricky!
#4 Careful with too much exposition or burning pictures
Coming back to the point above, exposition and luminosity are great, but be careful with overexposing your pictures! When you take pictures under direct sunlight you better master the technique or have mind blowing retouching skills, or you'll end up without corners in your pics (which will be replaced with a lovely white stain), white parts where there shouldn't be any, too much reflections... That sort of things.
Instead, when shooting in direct sunlight or noon, try taking your pictures under a shadow (as, under a tree or a high building which projects some sort of filtered light) or instead, find a great porch or lobby litten up enough but without sun rays entering directly.
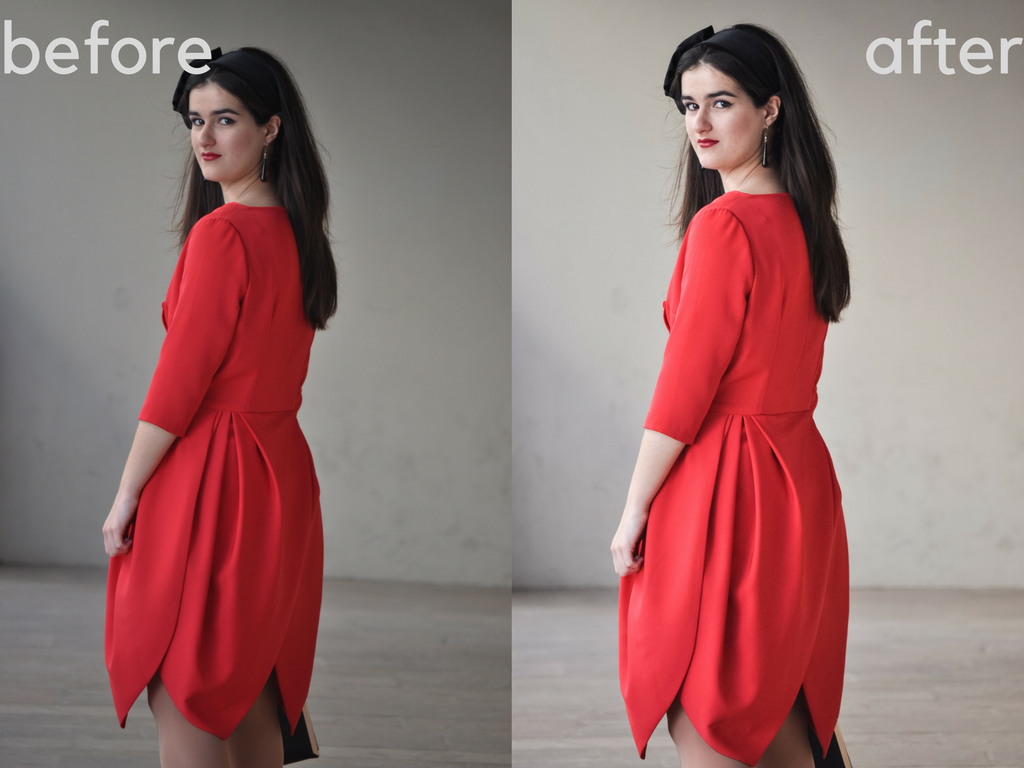
#5 Trimming, fugue points and vanishing lines
Pictures whose backgrounds are unclear, full of diagonal lines or uncentered subjects are a big NO-NO.
Kind of a mania as well, but I always look for refined lines and proportion so, besides correcting skin flaws which appear sometimes, looking for real horizontality at the horizon line (no matter if it's a wall behind you, or the actual horizon!) and verticality in façades and props surrounding me, with Photoshop's tool "skew" its super easy to achieve those, which will add not only quality but also professionality to your fashion blog!
Also, sometimes trimming the picture helps not only on focusing both in the subject or the fashion item you are trying to highlight, but is also helpful when getting rid of unexpected aspects appearing at the background like, people staring weirdly, cars or vans, trashcans and other urban mobiliary. Not the best solution anyway, but sometimes it's helpful when finding the true purpose behind the picture as well.
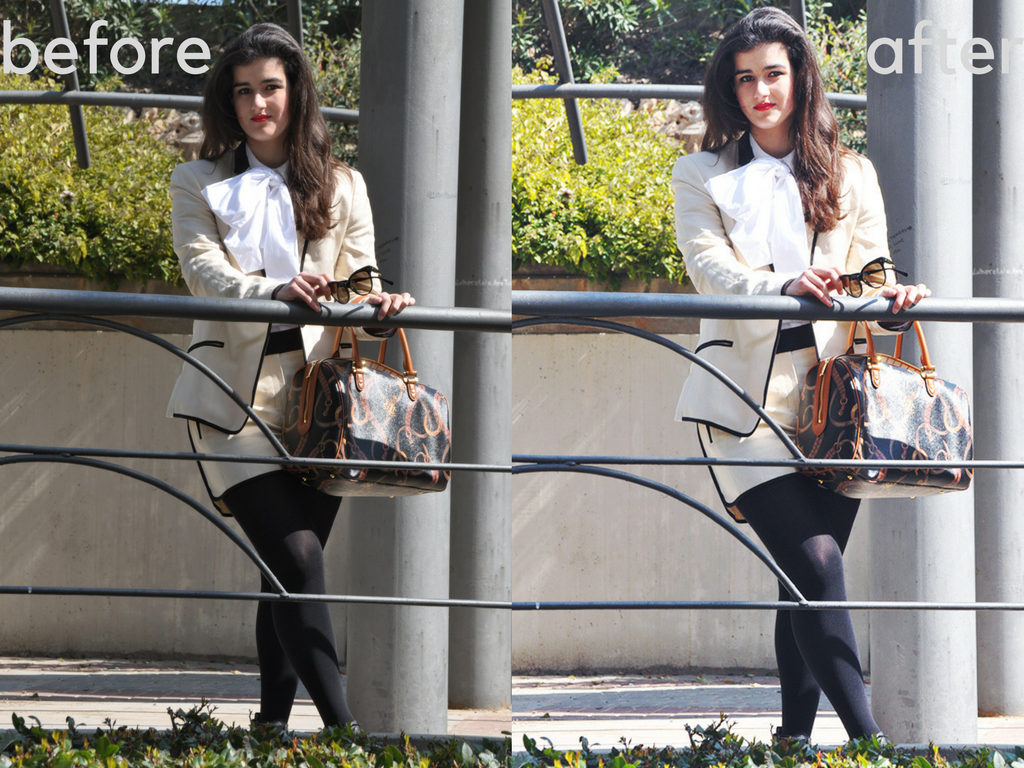
Before applying any color effects and corrections:
Pictures whose backgrounds are unclear, full of diagonal lines or uncentered subjects are a big NO-NO.
Kind of a mania as well, but I always look for refined lines and proportion so, besides correcting skin flaws which appear sometimes, looking for real horizontality at the horizon line (no matter if it's a wall behind you, or the actual horizon!) and verticality in façades and props surrounding me, with Photoshop's tool "skew" its super easy to achieve those, which will add not only quality but also professionality to your fashion blog!
Also, sometimes trimming the picture helps not only on focusing both in the subject or the fashion item you are trying to highlight, but is also helpful when getting rid of unexpected aspects appearing at the background like, people staring weirdly, cars or vans, trashcans and other urban mobiliary. Not the best solution anyway, but sometimes it's helpful when finding the true purpose behind the picture as well.
Before applying any color effects and corrections:
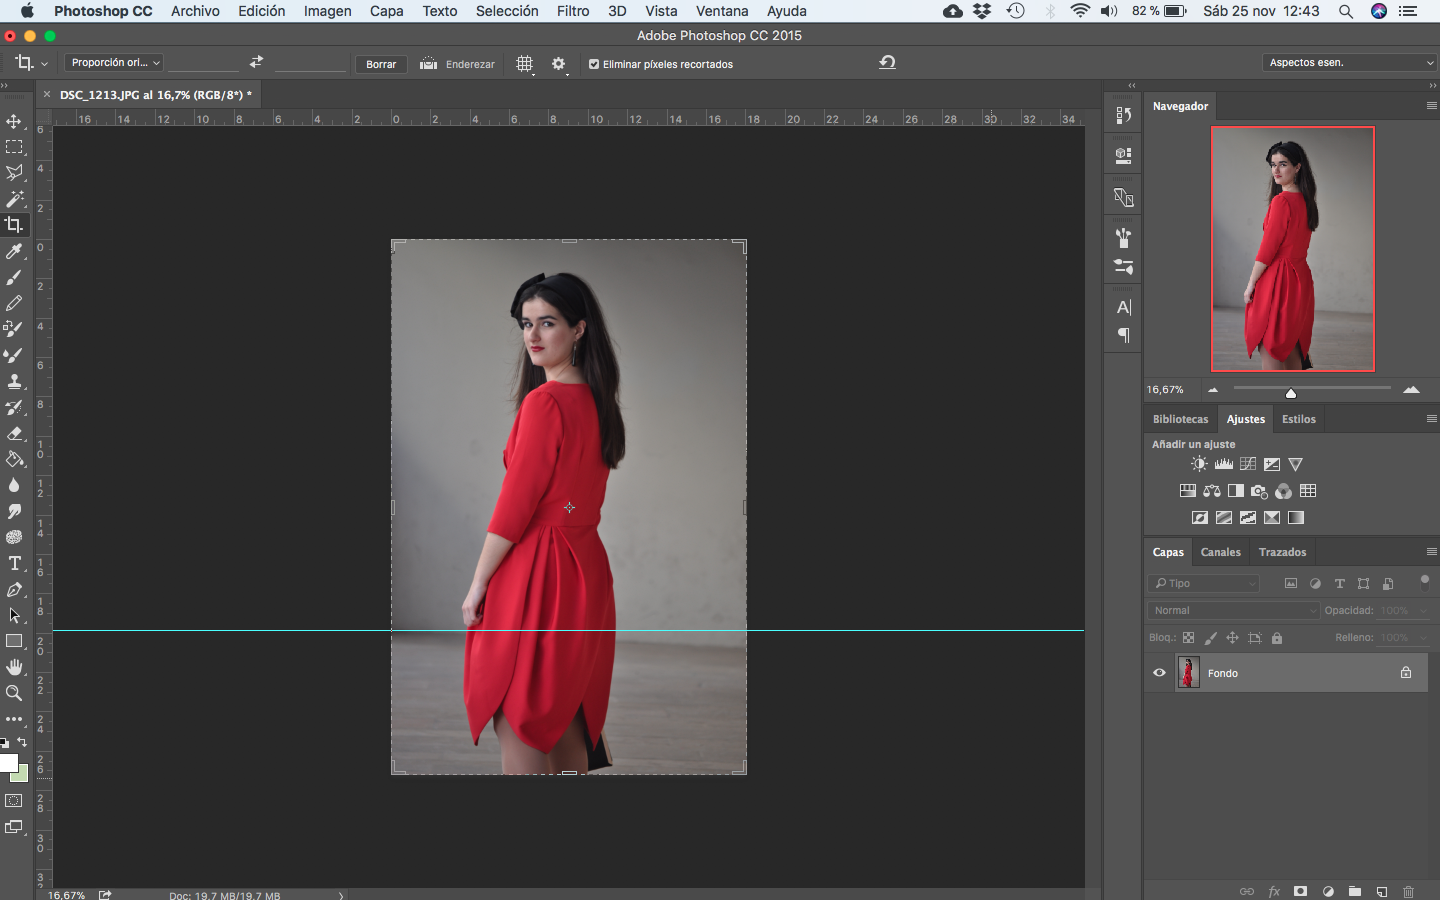
After correcting the horizon line (in this case is the wall behind me) and applying some trimming to the picture:

#6 Angles and poses
Tell whoever is taking your pictures to play with different angles, or take advantage of the background or place you're in to be part of the photoshoot! Why not climbing up those stairs to take the picture from below? What if you put your tripod a little bit higher or you sit on the floor to take a detail pic of your shoes?
As well as in the angles, try learning a couple of poses so you can vary and not only change your facial expressions, but also showing how the fabric or the shape of the dress/pants/whatever you are wearing act when walking, jumping of sitting on a bench. I personally have searched before for videos like this starring professional models as Coco Rocha, and where they show up some interesting or fun poses to try. And I said TRY, because you don't want to end up cracking your leg or anything when posing for pictures to be shown at your fashion blog!
#7 Locations
Yes, I know. Shooting pictures when going on a walk any regular day, trying to figure out where to carry the camera plus sporting those ah-wesome high heels you can barely walk in (I know what I'm talking about because I've been there too) it's tricky enough as to trying to shoot pictures for your fashion blog in different locations around the city. As if!
My point here is, even if you are not in the mood of shooting a whole editorial around your city/town/neighbourhood try to at least change the angles and backgrounds you're posing in. If you are in the middle of a bridge for example, try to take some shots at one of the sides and then in the middle. Or cross the street and walk casually to the camera. Or go to that amazing vintage door in the building in front of you and take some pictures grabbing the doorknob. As I said in my post of "10 things that will make you look better in front of the camera as a fashion blogger", find props and interact with your surroundings, so not all your pictures feature you in the same exact location only varying your facial expressions. Much better, huh?
#8 Different zooms at details and aspects of the outfit. Don't be repetitive
I'm so, so tired of fashion blogs featuring outfit pictures of their bloggers in the exact same poses and backgrounds. They get to share almost 10 to 15 head to toe pictures of them which I must say, doesn't have anything cool at all. I don't know about you, but I want to see not only how well that dress fits the model but also tiny details as the buttons, or maybe a zoom into the fabric or pattern, or how tall that shoe actually is... I don't know, but I want some variation!
My advice here for killer fashion blog pictures is always look for the unexpected in your outfits, like, how flowy the skirt actually is when you walk away, or the tiny necklace or earring you are wearing and which at first view might be unnoticeable... Not only the whole package counts when shooting pictures for a fashion blog, but attention to detail is key as well.
BONUS #1 What software do you use to edit the pictures at Something Fashion?
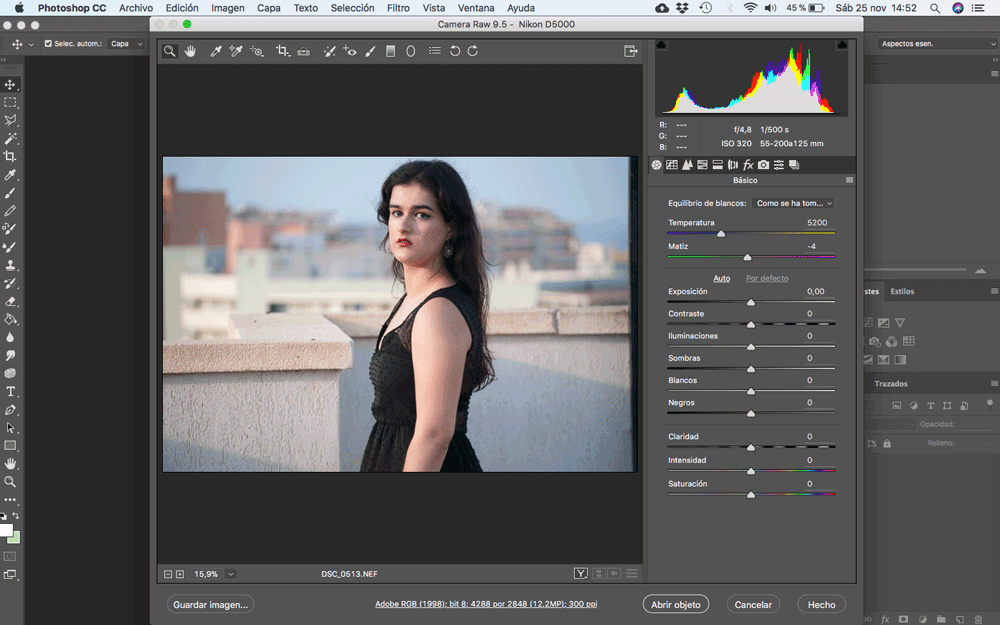
I've been using Adobe Photoshop CC 2015 for awhile, not only because I also use it for architecture projects and renderings and that has allowed me to have some serious skills at it, but also because I love the easy workflow, the very few time you have to spend there editing to achieve great results in comparison, and also because of the Camera Raw tools panel, which has improved dramatically the blog's pictures since the first day I started using it.
I've been using Adobe Photoshop CC 2015 for awhile, not only because I also use it for architecture projects and renderings and that has allowed me to have some serious skills at it, but also because I love the easy workflow, the very few time you have to spend there editing to achieve great results in comparison, and also because of the Camera Raw tools panel, which has improved dramatically the blog's pictures since the first day I started using it.
BONUS #2 What camera, lens and presets do you use to shoot fashion pictures?
The first posts here at the blog were shot with a little Canon PowerShot point-and-shoot, and even with the shabby webcam my laptop back then had. Such a mess. Then, I got the Nikon D5000 DSLR as a gift, and I never again got apart from it. It came with two lenses which I usually carry around and which I change depending on the lighting, the exterior conditions or what bag size I'm carry in that moment: one is the NIKKOR 18-55mm and the other is the Zoom-Nikkor 55-200mm which may not be the ideal lenses for shooting portraits or fashion pictures (that's what I've been reading in different sources), but they are quite handy.
The first posts here at the blog were shot with a little Canon PowerShot point-and-shoot, and even with the shabby webcam my laptop back then had. Such a mess. Then, I got the Nikon D5000 DSLR as a gift, and I never again got apart from it. It came with two lenses which I usually carry around and which I change depending on the lighting, the exterior conditions or what bag size I'm carry in that moment: one is the NIKKOR 18-55mm and the other is the Zoom-Nikkor 55-200mm which may not be the ideal lenses for shooting portraits or fashion pictures (that's what I've been reading in different sources), but they are quite handy.
![About [span]me[/span]](https://farm5.staticflickr.com/4335/35565816704_416c791419_o.jpg)

2 comentarios
A great outfit especially for a photography lover! You're right about The Golden Hour, you really can create some wonderful shots that's for sure!
ReplyDeleteIt's funny you say don't shoot at night, I actually did one (because sadly in the UK it's getting so dark so early) and the photos came out fairly okay!
It's great to crop and edit photos to make them look amazing, it's great when you get the imagery right and the photos come out great without needing to do too much :)
Thanks for sharing!
Laura xo
www.shehearts.net
Hi Laura!
DeleteWell, about the thing of not shooting at dark, of course is just my personal advice. I shoot at night sometimes too, but I don't really like it because after I have to spend so much time editing and correcting things (and being careful with the background noise, and other many things) that I just prefer waiting until I have a free day able to shoot at daylight. I find it so much more convenient!! :DDD
Thanks for stopping by and dropping a comment <3
Best!!
Amanda